AmigaOS4.1
boot process UBOOT.
I was thinking it be nice to write a useful Blog about the boot process of AmigaOS4.1.
Many people have problem understanding the Boot Process, coming from Classic Amiga (500/1200/4000), or if they are used to a PC. That has Windows preinstalled.
AmigaOS4.1 can boot from tree different Firmware types (On PC there is BIOS or UEFI, on PowerPC there different Firmware).
On Pegasus II, there is OpenFirmware.
On AmigaONE-X1000 there is CFE.
On AmigaONE-XE/SE/Mini there is UBOOT.
On Sam440/460 (AmigaONE-500), there is UBOOT.
The most common BIOS Firmware is UBOOT this the one most people are having problems with. CFE and OpenFirmware is easier to use.
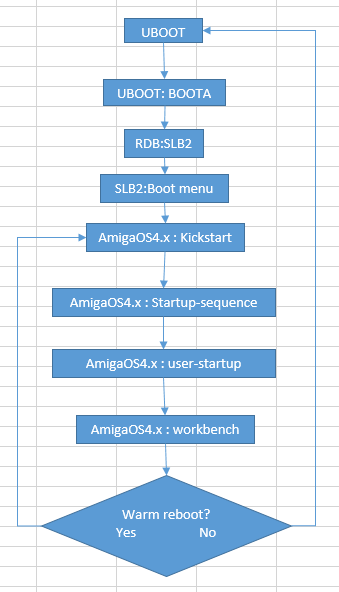
The uboot boot
process.
UBOOT checks hardware and scans SATA and IDE and USB buses for devices.
Once it knows what is connected, it goes to the next step, this where things can go wrong.
For Linux the boot process is simple, as UBOOT diskboot command loads in kernel from PPCBoot image device all you do is define the controller number and the partition number and it finds it.
For AmigaOS this bit more complicated, BOOTA is not feed the controller, nor the partition number instead, the boot process depends on BOOT1 and BOOT2 variables, If device defined in BOOT1 is not found it goes to the next one BOOT2.
This sound simple, but here is the problem, BOOTA does not know what is a CDROM or HD, unless you have defined it, there for you will need to have UBOOT variable for etch controller that defines what is wired to a CDROM what connector what is not in use, and what connector that is wired to Hard drive.
This is defined by the UBOOT variable a1ide_conf for AmigaONE-XE/SE ide controller, for other controller the name of variable is different, but the suffix is always _conf.
The variable defines what is connected to A1 ide controller.
0 is not connected
1 is HD
2 is CDROM
When BOOTA command knows what is CDROM and what is HD, the chance of success has increased.
The SLB2 is loaded from the RDB (Amiga partition table), the SLB will look for kickstart files on first bootable partition on hard drive it finds.
So if the kickstart modules are not found, you have done something bad when partition the harddrive, and setting up boot priorities.
If everything works out then kickstart modules are loaded, and AmigaOS4 kickstart takes over.
For AmigaOS4 kickstart to continue booting kickstart drivers must be loaded that support the controllers you have connected, and also it need to know that things are connected, once it has found the CDROM’s and HDDRIVES, it scan partition tables to boot partition or CDROM with the highest boot priority.
Here again you might have done something wrong, if you changed the boot priority of partition too high, then the kickstart will never boot from the CDROM. It can get really tricky to reset the boot priorities, luckily the AmigaOS kickstart was designed as the firmware for Classic Amiga, and it has not lost the possibility for user to select boot device.
By pressing the “Scroll Lock” key on the keyboard, you can get into boot menu of the kickstart, or you can hold the two mouse buttons.